Creating PDF forms with LaTeX
Posted on Sun 11 July 2021 in latex • 4 min read
Update 2023: While this all works in principle, I encountered too many PDF viewers where some form elements where doing unexpected things. The current approach is to only print visual form elements and make the form fillable with some PDF authoring software.
A few weeks ago I thought it would be a good idea to change a form such that it would be fillable on a computer. I started the task using LibreOffice, as other people not so familiar with computers are also editing the form occasionally. It became clear very quickly that working with fillable form elements in LibreOffice is a huge pain in the ass, so I switched to LaTeX to give it a try. Unsurprisingly that gave the desired results in the end, but I learned a few things one has to take into account if creating forms:
-
Forms using
hyperrefwork quite well, but some customization might be required. You need aFormenvironment, but that can contain the whole document. -
The
hyperrefdocumentation on forms is very limited, to figure out the availableborderstyleoptions I had to look into the PDF specifications1.hyperrefessentially creates the form elements and passes the options directly into the PDF. -
One should not assume that all PDF viewers support forms, which means that lines under the field should not be a part of the form field. The first version I distributed used
borderstyle=U2 for most text entries, so when people printed it to fill it out the lines under the fields went missing. This is obviously not so nice. The same problem applies to checkboxes, in this case withoutborderstylechanges, the boxes just vanished. Apparently a lot of smartphone previews which can print do not support forms and I underestimated the amount of people who have used them.Long story short: Make sure that the form looks fine without any support for PDF forms in the viewer, which means never to use borders and draw lines under/around the fields yourself. Some advanced hacking is required to do that for checkboxes and radios.
-
All inputs must have a unique name, otherwise some PDF viewers might not display the second input. Evince just displays everything, but you should at least check with Adobe Reader.
Some example customizations
I have added some commands to my custom document class, but it should be easy to adjust them. The borders for the form elements are made using tikz, so you have to load it.
First some default options are defined, which make sure that the border is not displayed using zero width borders. For the radio symbol see the hyperref documentation.
\renewcommand*{\DefaultOptionsofRadio}{print,radio, radiosymbol=6, width=\baselineskip, bordercolor={black}, borderwidth=0pt}
\renewcommand*{\DefaultOptionsofText}{print,bordercolor={black}, backgroundcolor=white, borderwidth=0pt}
TextFields
The fields itself are displayed either without any label at all (you must still provide a unique name) or with a label under the input field. All input fields are underlined to make them visible in printed forms. Multiline fields are displayed with a border.
Two commands are provided: \field and \fieldinline, which both take
name/label and width as arguments, e.g. \field{Your Name}{6cm}.
As the layout command is customized, it has to distinguish between the different style (with label, without label, multiline). This is done by checking the width of the label or the height of the field.
\renewcommand{\LayoutTextField}[2]{% label, field
\setbox0=\hbox{#1\unskip}\ifdim\wd0=0pt
\setbox1=\hbox{#2\unskip}\ifdim\ht1>3ex
% Multiline
\begin{tikzpicture}[every node/.style={inner sep=0,outer sep=0}]
  \node[anchor=west] (TextFieldNode) at (0cm,0cm) {#2};
  \draw [thick] (current bounding box.south west) rectangle (current bounding box.north east);
\end{tikzpicture}%
\else
% Inline field, lowered a little bit to be better integrated into the text
\raisebox{-3.2pt}{\begin{tikzpicture}[every node/.style={inner sep=0,outer sep=0}]
  \node[anchor=west] (TextFieldNode) at (0cm,0cm) {#2};
  \draw[thick] ([yshift=-0.3ex]TextFieldNode.south west) -- ([yshift=-0.3ex]TextFieldNode.south east);
\end{tikzpicture}}%
\fi
\else
% Field with label below it
\begin{tikzpicture}[every node/.style={inner sep=0,outer sep=0}]
    \node[anchor=west] (TextFieldNode) at (0cm,2ex) {#2};
    \draw[thick] ([yshift=-0.3ex]TextFieldNode.south west) -- ([yshift=-0.3ex]TextFieldNode.south east);
    \node[anchor=west,font=\footnotesize] at (0cm,-0.9ex) {#1};
\end{tikzpicture}%
\fi
}
\newcommand{\field}[2]{\TextField[width=#2]{#1}}
\newcommand{\fieldinline}[2]{\TextField[width=#2,name=#1]{}}
Radio fields
For radio elements this is a little bit more complicated. In theory you can just use
\ChoiceMenu[radio=true,name=Yourname]{}{Yes,No}
and two checkboxes with labels will be displayed side by side. The problem arises if the viewer does not support form fields, as the checkboxes will disappear, leaving only the labels.
The solution is to build the form yourself by placing a checkbox without a border inside a box drawn by tikz. To make things interesting some PDF viewers (e.g. Evince) do not display things behind a form element, so to retain the borders you must make sure that the form element is not over any lines.
I only required some Yes/No options in the form, so that is what is implemented
below. \yesnoticks{fieldname} displays the tick boxes and the labels, with
\yesno{Text}{fieldname} the explanation for the ticks is displayed on the left
with the ticks and the right in an uniform way.
\newcommand{\radiosize}{0.33cm}
\newcommand{\yesnoticks}[1]{%
\raisebox{-3.2pt}{\begin{tikzpicture}[every node/.style={inner sep=0,outer sep=0}]
  \node[anchor=west,style={inner sep=2px}] (FieldYes) at (0cm,0cm) {\ChoiceMenu[radio=true,name=#1,width=\radiosize,height=\radiosize]{}{=Yes}};
  \node[anchor=west] (LabelYes) at ([xshift=0.7ex]FieldYes.east) {Yes};
  \node[anchor=west,style={inner sep=2px}] (FieldNo) at ([xshift=1ex]LabelYes.east) {\ChoiceMenu[radio=true,name=#1,width=\radiosize,height=\radiosize]{}{=No}};
  \node[anchor=west] (LabelNo) at ([xshift=0.7ex]FieldNo.east) {No};
  \draw [thick] ([xshift=-(\radiosize+0.15cm),yshift=-(\radiosize+0.15cm)]FieldYes.north east) rectangle (FieldYes.north east);
  \draw [thick] ([xshift=-(\radiosize+0.15cm),yshift=-(\radiosize+0.15cm)]FieldNo.north east) rectangle (FieldNo.north east);
\end{tikzpicture}}%
}
\newcommand{\yesno}[2]{\pbox{0.8\textwidth}{\setstretch{1}#1}\hfill\yesnoticks{#2}}
Example
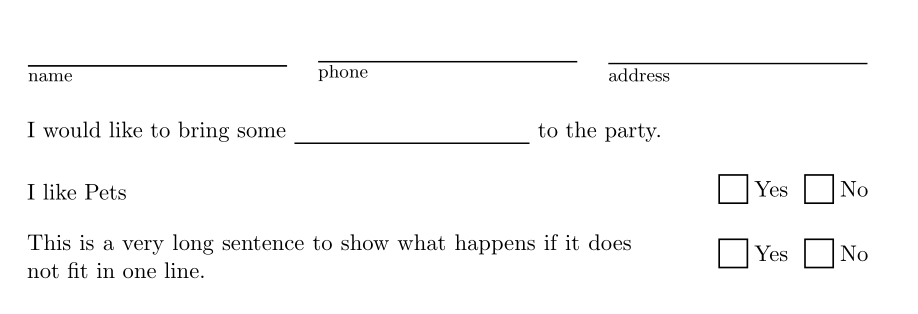
Using these customizations one can build a form using
\begin{Form}
    \field{name}{0.3\linewidth}\hfill\field{phone}{0.3\linewidth}\hfill\field{address}{0.3\linewidth}%

    I would like to bring some \fieldinline{things}{4cm} to the party.

    \yesno{I like Pets}{pets}

    \yesno{This is a very long sentence to show what happens if it does not fit in one line.}{lines}

\end{Form}
which will result in (all fields fillable in the viewer)
(download source code, resulting PDF)
See also / references
- https://texwelt.de/fragen/7850/wie-passe-ich-den-stil-von-formularfeldern-an-insbesondere-das-setzen-des-labels-unter-das-feld-und-rahmen-bei-textfeldern (in german)
- https://texwelt.de/fragen/7946/wie-setzt-man-die-breite-von-textfield-und-einer-linie-mit-tikz-layout-synchron-und-mit-fill (in german)